How to Crop a Shape in Powerpoint Home Appliance Clip Art
This affiliate is from the book
Cropping and Resizing Pictures
It's of import to learn to crop and resize pictures properly rather than only stretching them to fit into a space. Not simply does this avert the warped "funhouse mirror" images that effect from stretching, just a expert crop volition often increase the drama factor of your image and make it stand up out that much more. You lot can also crop pictures into shapes such every bit an oval or a rounded rectangle.
Resize Pictures
Always resize pictures proportionately; otherwise, people and objects will wait besides wide or too narrow.
-
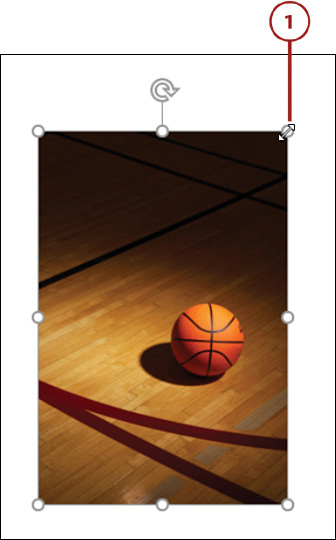
Insert a picture onto a slide and select it. Click and elevate a corner handle of the image to resize smaller or larger.
-
Don't drag from whatever of the side handles; this will misconstrue the picture even if you do press Shift!
-
If your picture is distorted, click Reset Picture on the Picture Tools Format tab, and then click Reset Picture & Size. The Reset Flick selection higher up it removes artistic furnishings and other formatting options, but it doesn't restore the proportion.
Ingather Pictures
Use PowerPoint'south crop tools to get rid of parts of pictures and help them better fit into their designated infinite. Insert a picture onto a slide to get started.
- Select the picture and click the Crop button on the Picture Tools Format tab.
- Crop handles will announced on the sides and corners of the image, indicating that you're ready to crop.
- Move your mouse arrow toward a crop handle. When information technology turns into a blackness crop tool, click and drag the ingather mark to crop the picture.
-
Notice that cropped areas of the movie volition become semitransparent so y'all can easily come across what you're cropping out and what y'all're leaving in.
-
Later y'all've positioned the crop handles, you may want to resize the picture inside the crop frame. To do this, click and elevate one of the round corner handles. If necessary, press Shift to keep the picture from distorting.
-
To reposition the flick inside the crop frame, click anywhere on the motion picture. When the cursor becomes a iv-headed arrow, drag information technology into position.
- When you lot're finished, click away from the flick, press Esc on your keyboard, or click the Crop button on the Ribbon to employ the crop.
Crop to Aspect Ratio
Crop to Aspect Ratio is the fastest style to create pictures that will perfectly fit your slide. To begin, insert a picture onto your slide and select information technology.
-
On the Picture Tools Format tab, click the Crop button arrow, bespeak to Aspect Ratio, then cull 16:9.
- Crop marks will appear so you tin can encounter how the picture volition be cropped in order to fit the desired aspect ratio. Resize and reposition the picture within the crop frame if necessary. See steps 5 and 6 in the previous exercise for instructions.
- Click the Crop push button once more when you're finished cropping.
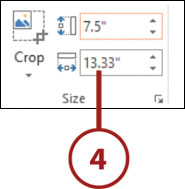
- If necessary, select the picture over again to resize information technology. On the Picture Tools Format tab, input vii.five as the Height value and press Enter. Bold you cropped to the 16:ix aspect ratio, the width volition automatically change to xiii.33". If y'all cropped to the 4:3 aspect ratio, the width would automatically change to 10".
- Drag the picture into place to cover the slide or use the Align tools to position it.
Crop to Shape
You tin can fill a shape with a picture show, simply sometimes it's easier to crop the picture into a shape. To begin, insert a film onto your slide and select it.
- On the Picture Tools Format tab, click the Crop push arrow, and so signal to Crop to Shape.
- Select a shape from the shape gallery that appears. The moving picture volition be cropped to the selected shape.
- If necessary, select the motion-picture show again and click the peak of the Crop button and then you tin resize and position the picture inside the shaped crop frame. Use the instructions in steps v and 6 of the Ingather Pictures exercise.
- Employ more formatting as desired, for instance, soft edges or creative filters.
Source: https://www.informit.com/articles/article.aspx?p=2459343&seqNum=2
0 Response to "How to Crop a Shape in Powerpoint Home Appliance Clip Art"
Post a Comment